PAGES

SLIDER

Showing posts with label leaves. Show all posts

How to Make Fall Leaves - Part #2

Friday, November 7, 2014

 This is the second half of a 2 part tutorial on making fall leaves. In the first half I showed you how to cut out a leaf and make it look more realistic. Click here to read Part #1.  In Part #2, I'll discuss using different petal dusts on your leaves to achieve bold vibrant colors.


At the top of this picture is a plain yellow leaf that was cut out of gum paste. Below it are three examples of the same basic leaf that were brushed with different colors of petal dust. Yes... even the orange leaf started out yellow. The color possibilities are endless!!!


Here's a similar example to the one above. Except I used pink gum paste instead of yellow to make the basic leaf.

Before we get started, here are a few basic rules to keep in mind:

1- Never start out using dark colors. 
You can always make a color darker... but it's almost impossible to lighten it up! This same rule applies to both gum paste and petal dust. By starting out light,  it's easier to vary the value and intensity of each color.
2- Less is more.
Begin by adding colors a little at a time. You can always apply more color later... but it's very difficult to remove once it's on.
3- Blend the edges of the colors together.
Doing this will make the colors flow together naturally, so they won't look spotted or splotchy. Be careful, however, not to over blend!
4- Don't worry if the tips or small parts of your leaf break off.
The truth about fall leaves is that they're either drying up or already dead. Take a look at real leaves... you'll notice that they're all shriveled up, crumbly, torn, or even have holes in them. Leaves are not perfect. In fact, they'll look more realistic if they have flaws.
5- Use many different colors of petal dust on each leaf. 
Don't be afraid to make extra leaves and experiment with your colors. You won't know how they work unless you try them. 
6- Use a lot of different brushes.
I use small paint brushes to apply the petal dust. For this tutorial, I used one brush for the yellows, one for the greens, one for the light reds and oranges, and one for the dark reds and burgundy. Plus I had one very tiny brush for only dark brown.

OK... let's start with the yellow leaf.
I began by dusting a mid-tone yellow here and there, concentrating on the center of the leaf.


Then I randomly add light orange to a few other places on the leaf.


Next, I deepen the color by adding a mid-tone orange to the outside edges of the light orange spots.


Then I add a couple of different reds to the outside areas of the dark orange. The farther out from the center I go, the darker the colors become. Finally, I hit a few of the lighter spots with bright yellow. This helps add vibrancy to the leaf.


The next step is to add a just a touch of dark brown. Using the flat side of your tiny brush, stroke upward across the very outside edge of your leaf. This helps bring dimension and realism to it's appearance. Finally, add just a hint of brown to the veins. Be careful not to go too dark, or the veins will look like you drew them in.


There's a huge variety of colors you can make with a basic yellow leaf. Play around a little, and see what kind of colors you can come up with.


Next up... the red leaf.
I start by adding a reddish orange color to different parts of the leaf.


Next I brush on a mid-tone red to the remaining areas.


I deepen a few of the reds by adding an even darker red color.


 Finally, to make the dark reds look even richer... add burgundy to a few spots. You can also add some pink or light orange to brighten the lighter areas. Finish off by touching just the outside edge of your leaf with dark brown, and then lightly trace over the veins. (Do this the same way it was described above for the yellow leaf.) 


Here's an example of a variety of colors you can achieve by starting out with the same basic pink leaf. Try using different shades of orange, pink, red,  burgundy, and even a little dark green. 


These fall leaves are a great way to practice your skills. Don't be afraid to play around and use a variety of color combinations. You can even try adding blue or purple to your color scheme! If a leaf breaks... don't worry, it doesn't matter. You can still use it! The whole idea is to discover new ways to use color and to have fun. You might even be surprised at how artistic you can be!!! 

How to make Fall Leaves - Part #1

Thursday, November 6, 2014

Fall is my favorite time of year! The harvest season finally is over, the crisp autumn air moves in, and the kids go back to school. It seems that life becomes more relaxed, and everything begins to slow down just a bit. One of my favorite things about this time of year is watching the leaves transform into a beautiful display of colors!

Where I grew up, the leaves pretty much went from green to yellow to dead. Although it was beautiful, those leaves can't compare to the kaleidoscope of autumn colors found in other areas of the country. I now live in Utah, surrounded by majestic mountains with several canyons only minutes away from my front door. If you drive through these canyons during the fall season, the array of colors you'll see is simply breathtaking! 

A few weeks ago, I decorated a cake with several different fall flowers and leaves. Some people asked me how I made these leaves, while a few even thought they were real! Now that's quite a compliment! (Pardon me... I'm blushing at the moment. LOL)  So I thought I'd put together a tutorial to show you how it's done. 

This tutorial will be broken up into to two blog posts. Part #1 will show you how to cut out the leaves. Part #2 will show you how to color the leaves. 


PART ONE:  Cutting out the leaf.
You'll need: gum paste, rolling pin, ball tool, foam pad, triangle makeup sponge, leaf cutter, and a leaf veiner. 


Roll the gum paste out until it's thin. Place it over the top of the leaf cutter. Roll the rolling pin over the gum paste, then run your finger across the edge of the cutter. Doing this will give you a much cleaner cut edge. 

The leaf cutter I used has an annoying thick stem at the bottom of the leaf. (I have no idea why they designed it that way!) Use a sharp knife to cut the outer edges of the stem off so it'll look more realistic.

Next get your veiner and makeup sponge ready.

Place your leaf over the top of the veiner. Then, using the makeup sponge, press down on the leaf to imprint the vein details onto the gum paste.

Fold your leaf in half to make the center vein more defined.

Place the leaf on a foam pad, then use the ball tool to thin the outside edges of the leaf.

Using your fingers, pinch together the bottom stem and the tip of each rounded edge on your leaf. You can see above that the edges on the right side are pinched, while the edges on the left are not. Forming little points like this instead of leaving the edges round makes a huge difference. I think this one of the most important steps in making your leaf look more realistic.

Here's the finished leaf!  Dry your leaves on crumpled aluminum foil or egg crate foam to keep them from being too flat. Now let the leaves dry completely before adding any color.


Learn how to add color to your leaves by reading the second half of this tutorial tomorrow. In part #2 we'll use colored gum paste (instead of white) to make the leaves. The difference is that when you dust color on white gum paste, the leaves will have more of a pastel appearance. While leaves made with colored gum paste will look bold and bright when you're done. The same steps, however, apply regardless of what color gum paste you decide to use.  
Click here to read Part #2.


COMING UP NEXT-

Part #2: Next I'll explain how to add vibrant colors to your leaves that will really make them pop!


Fall Cake

Tuesday, September 30, 2014

My last blog post was all about the tragedy of my poor broken dahlia. Well, here's the cake where my dahlia is now lives... 


Happy fall!!! :)

Tutorial: How to Vein Leaves

Wednesday, October 31, 2012

Guess what gang... I think it's time for another tutorial!!! (YEAH, the crowd goes wild!) LOL 

When I think of fall cakes, I quite often think of Autumn colors like orange, red, yellow, and brown. Eating yummy cake flavors like apple, pumpkin, or spice. I picture sunflowers, pumpkins, gourds, wheat, apples, and of course... fall leaves. 

There are several different ways you can make veins in your fondant or gum paste leaves. Some ways are easier than others, some are cheaper than others, and some are much more realistic looking than others. If you're making a sophisticated cake, then you may choose something that will give you a realistic effect. If you're designing a whimsical cake, then you might want a more simple looking vein. It just depends on what effect you want to achieve. I'm going to show you how to make veins using the following items:
In many of the pictures below you'll notice that I put the fondant/gumpaste leaf cutout on top of a thin piece of pink foam. The foam acts as a cushion preventing the vein imprint from going too deep. When I make leaves, I usually thin the edges of the petals with a ball tool. In the following examples, however, I didn't bother to do this.

1) Real leaf:  Find a leaf that has very heavy or defined veins. Place the real leaf, vein side down, on top of your cut out. Press down using a cosmetic sponge. The sponge helps to give gentle and even pressure as you push.

2) Toothpick: Use gentle pressure to push down on the toothpick. Be careful not to push the pointed end too deep, it can leave small holes.

3) Veining tool:  Using the narrow end of the veining tool, drag it across the leaf leaving vein lines behind.

4) Plastic vein from a silk leaf:  Take a silk or fabric leaf and pull the plastic veins off. Place the veins on top of the cutout and gently push down with a cosmetic sponge. Since these veins are made of plastic, they're more rigid. So be careful not to push too hard.

5) Corn husk:  Corn husks are one of my favorite ways to add veins to leaves and flowers. You can find corn husks at the grocery store in the Latino food section. Take a small piece of husk and put it on top of the leaf. Push down using the cosmetic sponge. You can reposition the husk several times and push down again if you want more veins.

6) Leaf Veiner:  You can buy dozens of different leaf veiners. As a matter of fact, you can probably find a specific veiner for every leaf or flower petal out there. The sky's the limit! Place your leaf face down on top of the veiner and push down with the sponge.

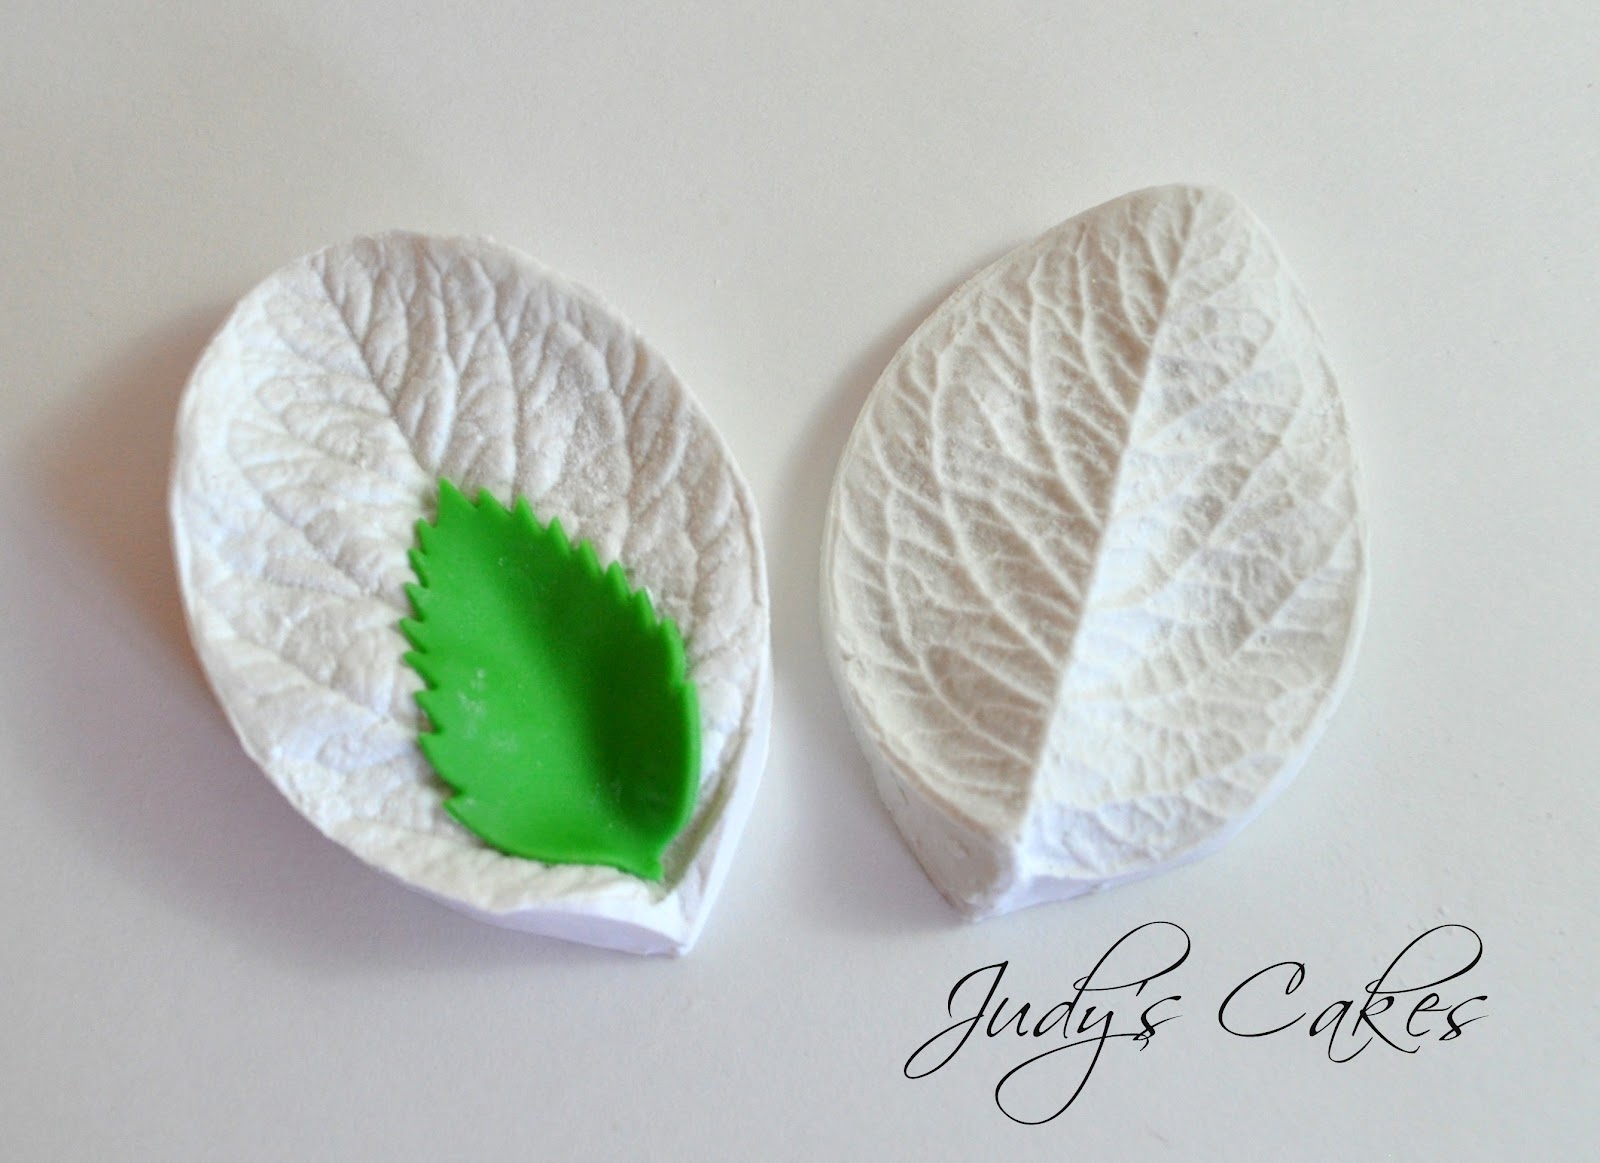
7) Double sided veiner: These veiners are the most expensive, but also the most realistic type of veiner. Simply match the two halves together and push down with even pressure. Before you place the leaf cutout on the veiner, make sure to dust both sides of the form with cornstarch or powdered sugar. Dusting keeps the fondant from sticking to the form. You can see the excess powder still on the leaf in the picture below. Just use a small brush and gently brush it off. This kind of veiner leaves an imprint on both sides of the leaf. Pretty awesome!

8. Plunger cutter:  Another way to put veins in your leaves is to use a "plunger cutter". After cutting out the leaf, simply push down on the plunger to remove the fondant from the cutter. The plunger leaves the imprint of veins on the leaf. I don't own a plunger cutter, but a lot of people like using them.
 

Give these examples a try, experiment with different ways to vein your leaves. You may even come up with a new method that works better for you! One thing I've learned is that there's no "one way" of doing things. So never be afraid to branch out and try new ideas!

Blog Design by Nudge Media Design | Powered by Blogger