PAGES

SLIDER

Cowboy Hat Tutorial

Thursday, May 27, 2010

I recently made this groom's cake for a cowboy who was also a bull rider in the rodeo. Thought I'd share how the hat was done:


Start with three 6" round cakes then carve the top layer to look like the peaks of a cowboy hat.


Crumb coat and frost the cake, then cover it with fondant.


Use a real cowboy hat to make a pattern for the brim. Put the hat on a piece of paper.


Hold the edges of the brim down and trace around it with a pen.


Cut out the circle you traced and use it as a pattern and for the brim.


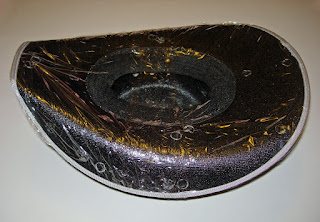
Cover the underside of the hat with plastic wrap.


I used glue dots to help hold the plastic wrap in place.


I forgot to take a picture... but the next step is to use the pattern and cut a circle out of fondant for the brim. The fondant used for the brim needs to be a little stronger. You can make it stronger by kneading gum paste or a little tylose together with it. (Using a 50/50 mixture of gum paste + fondant not only strengthens it, but it also shortens the drying time.) Place the fondant circle over the plastic covered brim of the real hat and let it dry for 5 to 7 days. The fondant needs to be completely dry before you remove it or the brim might crack and break. Once it's dry, put the cake on top of the brim and decorate the hat as desired.


After I finished setting up the cake, everyone thought it was a real hat! I was very pleased with the reactions. The client was so afraid that little kids might walk by and try to pick it up, that they put a sign by the cake that read... "Don't touch, grooms cake." Now I'd call that a success! :)


My New Toy

Monday, May 10, 2010

I hate to admit it, but sometimes I'm spoiled.... I've owned a 5 qt. Kitchen Aid mixer for a long time. Over the years I've used it to make bread, rolls, cake, cookies, brownies, whipped cream, candy, frosting, gum paste etc. I use it quite often to make white chocolate fondant. When making fondant, powdered sugar is kneaded into the dough (small amounts at a time) until it becomes very very stiff. So stiff in fact that making fondant can be a little tough on your machine. My mixer had been acting "sick" for a while and was making loud awful noises when turned on. This particular day, the mixer was working fine until it suddenly started slowing down. The motor ran slower and slower until it finally came to a complete stop. I tried turning it on and off a few times but nothing happened. My kitchen Aid was dead, never to be turned on again. Good bye 5 qt. mixer... (sniff, sniff)

The next morning I got in my car and drove all over the valley searching for a new mixer. I wanted one with a more powerful motor, and one that had greater capacity. Well, after pricing my mixer options, I realized spending that much $$$ was not going to be in my budget. The dream of buying the mixer I really wanted was probably just that... a dream. I came home and called my husband, informing him of the sad news. I complained a little bit but really wanted to cry on his shoulder. After listening to me whine for a while, he said he might know of a place where the price on mixers was quite a bit lower then what I'd seen. To make a long story short, a few hours later he came home bearing a wonderful gift of joy! A refurbished Professional 600 Kitchen Aid 6 qt. mixer at a fantastic price. Happy Day!

 Yes, Judy... there is a Santa Clause! :)

Pictures

Wednesday, May 5, 2010

A few cakes I've made:
This is a German chocolate cake with coconut pecan filling.  It's covered in white chocolate fondant, the grass is buttercream and each character is made from gum paste.


Chocolate cake with coconut macaroon filling. This was made for a very talented marimba player.


The beanstalk is made of Rice Krispies treats covered with fondant.


(Sorry, the lighting was bad for taking pictures.) Marble cake with chocolate and white truffle filling. This cake was huge! Each layer was 7" tall covered with sparkling sugar. The ribbon was 4" wide and I ended up making over 90 roses.

Cupcake Friday

Tuesday, May 4, 2010

I don't make cupcakes very often, but a while ago I ran across a few cuppy recipes that looked absolutely delicious! I decided to have a "Cupcake Friday" and spent most of the day testing recipes...


Oreo Cream:
These were very good. The cream cheese filling along with a mini Oreo cookie was a great combination.


 Cookie Dough:

How can you go wrong with cookie dough? Make sure to roll small balls of cookie dough and freeze them overnight. Add the frozen dough to the cupcakes right before you put them in the oven. This way the cookie dough won't cook when you bake the cupcakes.


Coconut Macaroon:

I love anything coconut and these were no exception. Just like the cookie dough cupcakes, you need to freeze small balls of macaroon filling and add them to the cupcakes right before baking.


Chocolate Strawberries & Cream:

I had extra cream cheese filling left over from the Oreo cupcakes, and some strawberries were waiting in my refrigerator. So I decided to stuff some cupcakes with strawberries and cream. Not only did they end up looking fantastic, but the taste was absolutely to die for! Yummy!

Blog Design by Nudge Media Design | Powered by Blogger